Krystal Staff Project Part 1 – Shaft Materials

The Krystal Staff Project is my attempt to create a game-accurate prop imitating Krystal's Staff from Star Fox Adventures and Super Smash Bros Ultimate. In this ongoing series of posts, I detail my process for creating it from scratch.
The project began over a year ago. I've been looking into the design and technical requirements of making Krystal's Staff from the games. Since this is the first post, I will detail the desired features:
- Lighted shaft (like Technicolor Cosplay's Staff)
- Raised details along shaft body
- Glowing bottom tip
- Glowing gems on top tip
- Opening and closing action on the top tip
- (Optional) Smoke/fog generation in the top tip
- (Optional) Sound effects in the top tip
- (Optional) Physical switches to control actions on the shaft itself
As I mentioned in the last podcast, I've already begun work on the project long ago. I've already explored 3D modeling the top tip for the purpose of 3D printing, and I've already mapped out a high-quality, game accurate texture for the shaft.
In Part 1, I want to tell you about generating the base shaft. After a bit of exploration, polycarbonate tubing seemed to be the way to go. It's both optically clear and very strong (used for lightsaber blades you can actually fight with). Basically glass but much stronger and lighter. The goal of the shaft is to have an underlying blue color which can project blue light outward along the blue channels in the original texture. It was important to have a blue color naturally so that it would still appear blue even when lighting effects were turned off. The tube would need to be flat at both ends so it could be lit from both directions. My thinking is that by keeping the lights at both ends, the center of the shaft can be used for the bulky battery power storage. Time will tell whether this is a workable strategy. Normally lighted tubes like this (as with lightsabers) either run the lights down the center, or rely on the center being open to shine a bright light down. Shining the light just on the edges is something novel, I believe.
Covering the blue areas would be the "gold" portions with printed or resin "carvings" glued on to give the shaft a physical texture of having actually been carved. That will be a subject for another time.
So, I got to work. First, I looked into many different forms of light generation. Since I wanted to have battery storage in the shaft, that meant very thin light source or a light source outside the tube body. I looked at OLED, Lumilor light-emitting paint, EL tape, flexible light guides, and LEDs in the tips. Sadly, all of the technologies except the last one was either completely unavailable or prohibitively expensive. The quote I got for Lumilor would have been around $2000 just for the paint, and it likely wouldn't have been bright enough anyway. LEDs in the tips it is!
I spent several weeks talking to several companies about obtaining blue polycarbonate tubing to use as the underlying Staff shaft. In addition to contacting a few plastic supply companies, I spoke to two different lightsaber companies, Kyberlight and TheCustomSaberShop. While they both had blue polycarbonate tubes, the longest one I could find (from anyone) was this 40 inch tube. That's not quite long enough for Krystal's Staff, and it is probably tipped with some a saber blade tip reflector, further reducing its length by a few inches. It just wasn't good enough. Sadly, while there are plenty of companies willing to do a custom order on colored polycarbonate, they usually require large batches, meaning I'd have to buy 500+ of them just to get one. Even at $10 a piece, that would represent a huge cost.
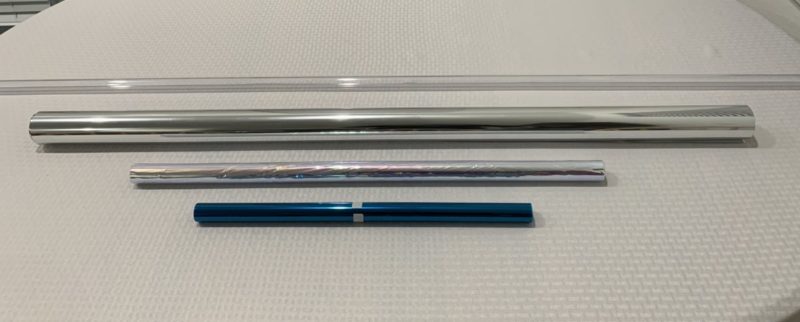
So, I had to try the consumer version. Polycarbonate tubes of much longer length are kept on hand by many sellers, but they are always clear, no colors. Acrylic tubes can be found in different colors, but I decided that acrylic would be too fragile for this prop. The goal would be to get a long, clear polycarbonate tube, and some way to color the outside blue. For that, I found some blue window tinting film. On top of that, I wanted to create a perfect internal reflection and diffusion system for the inside of the shaft, so bright lights shining down the edges of the tube would light up the whole length evenly. With some advice from Technicolor Cosplay, I settled on a pearlescent transparent wrapping film, which is often used by hobby lightsaber makers to diffuse the light source. To prevent reflections into the shaft body, I got a roll of highly reflective mylar film. That will go on the inner-most part of the shaft to separate the light and the batteries.
- Transparent Packaging Wrap, Opal - $7
- VIVOSUN Horticulture Highly Reflective Mylar Film Roll - $22
- Clear Polycarbonate Tubing 6 Foot - $20
- HOHOFILM 60"x20" Colored Window Film Clear - $15
- Total so far: $64 (though I can get at least four shafts done with the films and tints)
Next, I plan to assemble these materials, test it with light transmission, and figure out how to make the raised "carving" parts of the shaft.
Lastly, several people have expressed interest in me making them their own copy. I'm doing my best to keep costs down, but I have no idea how much the finish product will cost, both in terms of materials and labor. I'd like to make Staffs for people if they can pay, but be prepared, the cost will likely be well over $500 by my guesstimate right now.
See you next time!
Comments